Pages

Translate

Wednesday, August 20, 2014

Scor-Pal

Hi all,  it's been a few days since I have posted because I am into a whole other craft now and love it just as much as I love Paper Crafting, but I now share my time with it.  The World of Miniatures and Dollhouses :) A passion of mine since early childhood.  I will share more of that on here very soon.

BUT I now have wonderful news and I just had to share with everyone...

I'm not sure if all of you know about Scor-Pal tape but I am sure that some of you do and can testify to the fact that it is by far the best product ever for crafters of mini albums, regular albums or any other type of paper crafts where one might need a very user friendly, dependable strong double sided tape.  I am so stoked about the fact that I can now offer that at a great price right here on my blog.  Until I find a better way to set everything up I will offer my paypal user name for payment.  I can get any size you need and ship it to you whenever you need it.  I have the following sizes in stock right now but can get many additional sizes, all the way up to an entire 8.5 x 11 sheet of it.  Yes!  Isn't that amazing?

Paypal: starkey45356@roadrunner.com  that is also my email for any and all questions you may have about sizes, prices and shipping.  I will also have this in my Etsy shop as soon as I get it all set up.


Scor-Pal also offers many other paper crafting tools, like The Scor-Pal, the very famous tool most all card makers already know of and much much more.

The Scor-Pal scoring board has a slightly textured 12" x 12" scoring surface, with a raised fence at the top and on the left and right sides. Colored ruler marking on the fences are easy to see. This aligns your paper for perfect scoring. No more crooked cards!
When you place your card stock on the scoring surface, you are able to do multiple scores without moving the paper. Grid cards, accordion folds, boxes etc are scored in seconds.
Perfect tool for straight and diagonal line embossing on cards and scrapbook pages!
Scor-Mat
The Scor-Mat is a reversible self-healing cutting mat complete with measuring grid with 1/8"; 20 degree; 45 degree and 60 degree markings. The other side is perfect for stamping; brayering; and much more. It is designed to fit perfectly into the recessed area of Scor-Pal.
After scoring, no need to put your Scor-Pal away, simply insert the Scor-Mat and work away. Zip-Dry Glue and Scor-Tape can easily be removed from this surface.

SCOR-BUDDY

Scor-Buddy with Tote Bag
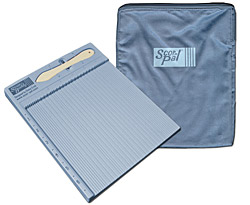
The Scor-Buddy was designed for card makers on the go and has grooves every 1/4" across the board, plus 1/8" grooves for the first and last inch of the board.
It measures approx. 9" x 7.5" and has a fence down the left side. A free Scor-Tool is included in the snap-in holder and it comes with its own faux ultra suede carry tote.


Scor-Bug


The Scor-Bug is a rotary tool which embosses a row of pearl like little bumps adding texture. 


Just ask me how you can have all these products to make your crafting life so much easier.  I have these products and love them and I know you will too :)

Friday, July 25, 2014

Frugal Tip


Hello friends. 

My what a beautiful couple of days we have had here in Ohio.   Just so sunny and bright and so much fun to be outside.  I personally can't handle the sun anymore but I remember when I could and I know the kids have been having a great time.

I had to send my machine in for repairs so I have been sort of at a loss for a project .  I decided to do a little catching up on supplies I may be low on or out of.  I took a very fun little trip to Springfield Ohio with my sister yesterday (Thursday) we went to Hobby Lobby.  I again spent way to much money, got a lot of really cool paper from The Paper Studio and a bunch of other stuff.  The best thing I got though was the new refills for my ATG gun and I will tell you why :)

As I was putting my new tape roll on the ATG gun I of course had to take the old stuff off.  I always get stuck just pulling it off until I end up with large bunch of paper backing.

 I thought to myself that this would make a great bunch of decorative filler.  I then decided to try it out, I stuck it in a very pretty box, cut it up a little and WALLA!  I have a great little gift, so very cute.  I will be saving mine from now on and will use it when I can match it with a project and the best part is that it is shiny, makes it that much more decorative.


j


I hope you all enjoy this tip and maybe find a way to use it yourself.  I think some of the other brands come in different colors, like maybe white.  This is such a frugal tip and I am so glad I thought of it as I am not the most frugal crafter.

Happy Crafting to all :)


Saturday, July 12, 2014

Pinwheel Card

It has been almost a month since I posted, just been very busy getting ready for my craft fair.

I did take time to put together the ever so popular Spinner Card.  I watched many Stampin' Up youtube videos and searched the web for 2 days and finally realized how to create one myself.  This is not my original idea.  It is everywhere online, just type in Spinner Card and you will find many pictures, but very few if any, free files for it.  (Stampin' Up has the bundle to make this fun card)

I am going to try to share my first file and instructions here today. :)  Wish me luck and please comment to let me know how I did.  Please disregard the cartoons in the background as the grandson was here visiting. :)


First of all I just cut a regular A2 card.   I took an 8.5 x 11 sheet of whisper white (Stampin' Up) cardstock and cut it in half to make two cards.   I then had a folded card that measured 5.5 x 4.25.  I then cut the mat piece at 5.25 x 4.  At this time I cut the spinners out as well.  I used the spinners in the Pazzles Craft Room but any spinner will work and I have another here that I have shared, in case you are not a member of the craft room.  I attached the mat with my ATG gun.  I then put a piece of cardstock into my printer and typed the sentiment I wanted, set it up with no margins, and tabbed it over twice and then hit the space bar 2 times to get it over to the opposite side of the card where I needed it to be when cut.  I placed the cardstock on the pazzles mat and made sure to line it up exactly at the top of the mat over to the left hand side.  I eyed it all in and cut, it turned out perfect.  It would have been easier maybe had I had a good collection of stamps, or even used the pen tool for my Pazzles but I wanted to try it this way.  I also cut the groove out for the spinner at this time.

I did get out the stamps I have and used the Gorgeous Grunge Stamp set (Stampin' Up) with the Crisp Cantaloupe and Coastal Cabana Inks (Stampin' Up) to make the splashy look on both cards.


 I then used a 2 penny sandwich, which I made out of a penny, a dimensional and another penny all stacked on top of each other.


I stuck a couple mini glue dots (Stampin' Up) on one side of the sandwich and then kind of stuck it behind the topper with the groove and then placed the spinner on top of the groove and connected them together with the grooved topper between the two.  I then put several demensionals on the back of the grooved topper, so that the spinner would have room to move and then stuck the topper onto the card.  WALLA a darling little spinner card!  Tip: Shake the card sideways several times until it gets set in there the way you want it and it spins good.


You could use any sentiment you can think of but I liked the "You Blow Me Away".  Stampin' Up has a stamp set made for the spinner card.  It includes that sentiment.  I came up with the Spinning By To Say Hi, but when I do it again I will drop the G and have Spinnin' By To Say Hi, I just think it looks more fun :)

I hope you enjoy and understand the instructions and if you have any questions please feel free to ask in the comment section and I will check back often.

WPC Spinner.
Groove Mat With Optional Grooves


Happy Scrappin'


Monday, June 23, 2014

Cards Sizes

I have not been on my blog for a while now.  It's not that important right now as I do not have many followers.  I will be up and running on a schedule soon and then I will have to take it more serious.
*****************************************************************************

I am newer to the whole card making craft and am always trying to figure out what size my card should be.  I found this great information on a website that is closing down so there is no reason why we can't share it here.  I am very excited to have this info on hand and hope it helps all of you as well.

Card Sizes

Here are the most commonly used standard card sizes for your handmade greeting cards. All dimensions shown are in inches.

A1 - 3.5" x 4.875"

The A1 size is most often used in fold-over style for thank you notes and in flat style for wedding response cards. If you like to write shorter thank you notes this is the right size for you, but if you tend to write a lot, you may want to opt for the larger A2 size.

A2 - 4.25" x 5.5"

The A2 size is the most commonly used size for a wide range of cards from invitations to announcements. As a fold-over style note card, the A2 gives you a little more room to write than the A1.

A6 - 4.5" x 6.25"

The A6 size is a little less common than its smaller or larger brothers, but it's a great in-between size for flat cards.

A7 - 5" x 7"

The A7 is a larger and more formal size for your most important events like holiday cards and wedding invitations. It has a substantial feel and gives you the most area for large photographs.

Biz (Business) - 2" x 3.5"

This is the size of a standard business card, and is used for calling cards and wedding table place cards.

Square - 5.5" x 5.5"

The square card is another large, substantial card and has a unique look all its own. Be aware that extra postage is required by the USPS for square envelopes!

Sunday, May 18, 2014

Craft Fair August 23, 2014

I am planning a Craft Fair in August. I will be swamped soon with all the workings of that, so today I decided to find some cute little things to sell cheap at the craft fair from my table and I decided to cut this darling little file.  It is a small recipe tote for sharing recipes.  I think it is a great little idea and I can't even count the times I have needed something like this and didn't have it.  My girls always want to know how I make this or how Granny made that so this will be a perfect way to share.  I also thought if one wanted to change the file around a bit it could also be used for many different things, like sharing photos and so on.


I tied a piece of twine in the top little holes for a quick little handle and if you look closely the back of it has a cute little closure made with the top of the lid and the { cut.  The little tip fits in the slit just perfect.  I did not design this file I bought it from the online silhouette store.  I put this together quickly I will use dry glue for the final ones.  Hope you enjoy :)


Friday, May 16, 2014

Pazzles May 2014 Inspiration Challenge

This month we were to find something that inspires us and do a project around it.  I was inspired by my kids and how much they loved their pet Walker.  He was chained up outside last week; when the kids came home he was gone.  My grandkids were so upset as they had had him since they were just babies.  They looked and looked and finally posted to facebook about it and with the help of social networking they found him that night.  A lady had found him out walking and she took him home gave him a bath and kept him until she found his owners.  How wonderful that they were able to find their puppy and I decided to make a new home for him :)  I made Walker a new dog house album and now the kids will have just the perfect place to display his photos. :)  I had so much fun with this.  My original plan was for the book to open on the sides but after dolling it up so much there was no way, so I had to make it open at the top, Oh well it's a grand little album and I am sure they will love it.  I hope you enjoy and possibly find a little inspiration yourself  :)


Sunday, May 11, 2014

Happy Mother's Day to You and Yours :)

I hope all you all had a wonderful Mother's Day.  I know I sure did.  I am super stoked about my new shelves.  My DH and Sister hung my shelves for me yesterday and I swear they are almost full already but I dearly love them, more space now for more crafting :)

 Believe it or not my sister (Teresa Childre) has always been a better carpenter than mhe is GREAT!

 Had to have some peg board installed while they were at it  - I just love all the storage :)


 How EXCITING!!!!

 Here is my DH taking a short rest before I proclaim "I think we need a 4th. shelf" - Off he went to Home Depot to get more brackets and another 10ft. board :)  Finally the finished project!!!!!!  LOVE IT!!!!!


 Thanks to JR and Teresa I am good to go now - Nothing can stop me now! hahaha